This post explains what Iliotibial Band Syndrome (ITBS) is, what causes it, and how to prevent and cure it. We have focused on this syndrome because many cyclists have experienced the pain of ITBS. I personally am currently recovering from ITBS, which prompted me to share what I have learned with you.
What is Iliotibial Band Syndrome?
ITBS is an overuse injury affecting the iliotibial band (ITB), which is a thick band of connective tissue running along the outside of the thigh from the hip to just below the knee. This band is so thick and so strong that a medical friend told me that students can use it like a suitcase handle to carry cadavers. So, it is almost impossible to break it.
However, once the iliotibial band is inflamed, it can be extremely painful. Mine is 10 out of 10 on the pain scale. I am unable to cycle, of course. But I am also unable to hike or swim either. Because it is a very long stabilizing band, almost any movement impacts it and can cause pain. I cannot even do pullups, because it causes a pull on the ITB. Basically, my current exercise schedule is reduced to nothing more exciting than chair yoga. It is very depressing, but it has freed up the time for me to write this post.
 | A foam roller (shown on the left) can help a lot to prevent iliotibial band syndrome. It is also effective for combating piriformis syndrome. Plus, you can use it to relax the muscles in your back, hips, and legs after a tough bike rides. Usually costs around $35. Please click here to view current price on Amazon Exercise bands (shown on the right) can be used to make your workouts more challenging. Usually cost around $10. Please click here for current price on Amazon. | 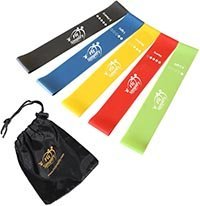 |
Related Post: Piriformis Syndrome in Cyclists – How to Prevent and Cure It
Knee Pain Caused by Iliotibial Band Syndrome

 ITBS is usually characterized by pain and inflammation on the outer part of the knee
ITBS is usually characterized by pain and inflammation on the outer part of the knee. Many cyclists describe ITBS as a stabbing or stinging pain along the outer side of the knee. Some describe a feeling of the IT band “snapping” across the knee as they bend and straighten it. Some people experience swelling of the knee and tightness of the hip.
However, my ITBS is different. The pain starts at the hip and extends half the way down to the knee. If you’re going to suffer, go big! It is a long band, and any part of it can become inflamed.
Typically, the pain is exacerbated by activities involving repetitive knee bending and straightening, such as cycling. When it’s very bad, it becomes painful to even walk.
Related Post: How to Cure Cycling Knee Pain with a Very Effective, Cheap Cure
Identifying the Iliotibial Band
Imagine the ITB as a thick band of connective tissue that holds and stabilizes your thigh from your hip to your knee. It extends through these areas:
- Hip Area: The IT band originates at the iliac crest (the top part of the pelvis) and runs down the outside of the thigh.
- Lateral Thigh: It continues down the lateral (outer) side of the thigh.
- Knee Area: It attaches to the lateral epicondyle of the tibia (just below the knee on the outer side).
Possible Causes of Iliotibial Band Syndrome
Overuse and Repetitive Activities
Activities like cycling can cause repetitive friction between the ITB and the outer knee. In my case, the syndrome was caused by a combination of cycling and excessive clam shell exercises. I was doing the clam shells because I was worried about hip pain, so I wanted to strengthen my hip abductor muscles. Turns out the pain was caused by early ITBS, and doing 100 clam shells per day was literally the worst thing I could possibly do.
Improper Training Techniques
Sudden increases in activity intensity or duration without proper conditioning. (Yep, I got this one wrong too.)
Biomechanical Issues
Poor posture, misalignment of the legs, flat feet, or differences in leg length can contribute to ITBS.
Badly Fitted Bike and/or Saddle
Nothing will get you injured faster than having a badly fitted bike. In particular, it is crucial to get your saddle height and setback (fore/aft position) right. Check out our post that explains exactly how to do this.
Related Post: How to Find the Right Height and Setback for Your Bike Saddle
Weak Hip Muscles
Weakness in the hip abductors can lead to instability and increased stress on the ITB. Well, weak hip abductors were exactly what I was trying to fix. But apparently, there is such a thing as trying way too hard!
Inadequate Stretching
Lack of proper stretching before and after exercise can lead to tightness in the ITB.
Related Post: Complete Guide to Stretching for Cyclists
Preventing ITBS in the Future
Gradual Training Progression
Increase activity levels gradually to allow the body to adapt. I always advocate the 5% rule. Never increase your exercise by more than 5% at a time. (I said I advocated the rule. Never said I follow it. That is probably my most serious mistake.)
Note: If you really want to be careful about increasing your training intensity (which is the best way to avoid injury), consider investing in a smart watch that tracks your body battery and advises on recovery hours. If (like me) you tend to overdo things, it is better to have your watch nag you, rather than your partner. Personally, I am much more likely to listen to my watch. The cheapest watch that does this well is the Garmin Forerunner 255. Current price on Amazon: .
Proper Equipment
Ensure that your bike settings are appropriate for your body mechanics. Get a fitting or get a book and do it yourself. Just be sure to do it every time you get a new bike. Nothing is more important than that. A badly fitted bike can hurt just about every part of your body.


Cross-Training
Incorporate a variety of activities to avoid repetitive strain on the ITB. For example, do some yoga to stretch your limbs out and repair some of the damage done by spending hours hunched forward on a saddle!

 Do some yoga to stretch your limbs out and repair some of the damage done by spending hours hunched forward on a saddle! This is me and Maggie in happier days (when I did not have ITBS and could still smile while moving)
Strength Training
Strengthen the hip and gluteal muscles to improve stability and reduce stress on the ITB. (But don’t overdo it, like I did!)


Related Post: 5 Great Strength Exercises for Cyclists
Stretching
Regularly stretch the ITB and surrounding muscles to maintain flexibility. See our post which presents a complete stretching program for cyclists.
Exercise Program to Treat ITBS
Stretching Exercises Specifically Targeting Iliotibial Band Syndrome
I have been doing these myself, and believe me, they work. I can now walk without scaring the dogs by occasionally screaming in pain. You should see improvements within just the first few days. Try to do them a minimum of twice a day. If you are in a lot of pain, you can try the first and third ones in a swimming pool.
Note: Do NOT stretch right after icing. Rather, do your stretches and/or exercises first, then ice. While the ITB is very strong, you will also be stretching other muscles and tendons, and they might be injured if you stretch them while they are icy and numb. In fact, it is best to heat your muscles with a hot tub, exercise, or a hot pad before stretching.
 |  |
Iliotibial Band Stretch
Description: Stand with your affected leg crossed behind your other leg. For example, if the affected leg is your left leg, cross your left leg behind your other leg. Then lean towards the unaffected side (in this example, your right leg is in front, so you lean to the right) until you feel a stretch on the outer thigh of the affected leg (left leg).
Duration: Hold for 30 seconds. Repeat 3 times on each side, just for balance. Go very slowly and carefully at first, because this may hurt. (Actually, it almost certainly will hurt at first).
Note: You can also try this lying on your side on your bed, with the affected leg stacked on top. You then drop this leg behind the other leg, touching your big toe to the bed. If you like, you can increase the stretch by bending your upper knee. This stretches the ITB more because it goes beyond your knee.
Foam Roller ITB Stretch
Description: Lie on your side with a foam roller under your affected leg’s ITB. Use your arms and the unaffected leg to control the pressure as you roll back and forth. (It is easier to do this if you have not also damaged your rotator cuff by excessive pullups. Yes, that was my other mistake.)
Duration: Spend 2-3 minutes rolling, focusing on tender spots.


| A foam roller (shown on the left) can help a lot to prevent iliotibial band syndrome. It is also effective for combating piriformis syndrome. Plus, you can use it to relax the muscles in your back, hips, and legs after a tough bike rides. Usually costs around $35. Please click here to view current price on Amazon Exercise bands (shown on the right) can be used to make your workouts more challenging. Usually cost around $10. Please click here for current price on Amazon. | |
Standing or Kneeling Hip Flexor Stretch
Description: Stand or kneel with one foot in front of the other in a lunge position. Bend the front knee and press your hips forward, stretching the hip flexor of the back leg. The key to this exercise is gently pressing your hips forward until you feel the stretch.
Duration: Hold for 30 seconds. Repeat 3 times on each side.

 The Kneeling Hip Flexor Stretch will give a good stretch to your iliotibial band, as well as your hip flexors
Strengthening Exercises
Clamshells

 Clamshells can be made more challenging by using exercise bands
Oh, the irony! This is supposed to help cure ITBS, but in my case, it helped to cause it. The key is slow, careful, and moderation. Be the tortoise, not the hare. And don’t be just plain stupidly excessive, like me. If your ITBS is acute, it is probably better to hold off on this one until you are starting to feel better. Once you are in excellent shape again, you can increase the intensity by adding a resistance band.
Description: Lie on your side with your knees bent and feet together. Keeping your feet together, lift your top knee as high as possible without rotating your pelvis. Lower slowly. See illustration below, which demonstrates a clamshell with a resistance band. Notice he has his right arm on the ground. This is essential to get the hip angle just right.
Sets and Reps: Do 3 sets of 15 repetitions on each side. (Don’t do 100!)
Resistance bands are needed for lateral band walking, and can be used to add resistance while doing clamshells. Click here for the current price on Amazon


Side-Lying Leg Lifts
This was the OTHER exercise that I did to excess, and which then caused my ITBS. So, the same caution. Tortoise, not hare. (And definitely not idiot.)
Description: Lie on your side with legs straight. Lift the top leg to about 45 degrees and lower it slowly.
Sets and Reps: Do 3 sets of 15 repetitions on each side.
Hip Bridges (also called a glute bridge)

 Hip Bridges (also called glute bridges) are excellent for strengthening your glutes
Description: Lie on your back with knees bent and feet flat on the floor. Lift your hips towards the ceiling, squeezing your glutes. Hold for a few seconds and lower slowly.
Sets and Reps: Do 3 sets of 15 repetitions.
The glute bridge is an excellent way to strengthen your glutes and your hip flexorsLateral Band Walks
Description: Place a resistance band around your thighs, just above the knees. Slightly bend your knees and take small steps to the side, maintaining tension in the band.
Sets and Reps: Do 3 sets of 15 steps in each direction.


| A foam roller (shown on the left) can help a lot to prevent iliotibial band syndrome. It is also effective for combating piriformis syndrome. Plus, you can use it to relax the muscles in your back, hips, and legs after a tough bike rides. Usually costs around $35. Please click here to view current price on Amazon Exercise bands (shown on the right) can be used to make your workouts more challenging. Usually cost around $10. Please click here for current price on Amazon. | |
Related Post: 3 Easy Tips for Preventing Plantar Fasciitis – and 5 Simple Exercises to Cure It
Additional Recommendations to Cure Iliotibial Band Syndrome (ITBS)
Anti-Inflammatory Medications
Use as directed by a healthcare provider to manage pain and inflammation.
Professional Guidance
Consider seeing a physical therapist for personalized treatment and to address any biomechanical issues. In my case, a chiropractor provided a huge amount of relief (but the treatment itself was painful).
Rest and Ice
Rest from aggravating activities and apply ice to reduce inflammation. (Maybe take up chair yoga?)
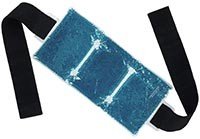
Tips for Icing when You Have ITBS
This is quite tricky because the ITB is so long. In my case, the entire ITB is inflamed, so I am doing the entire length. This takes more than one ice pack, and quite a bit of time. If your pain and inflammation is localized to just one area, then it would be better to focus your icing on that area.
Try to have the ice pack on your skin. If you do this, don’t exceed 20 minutes, and monitor your skin carefully. Alternatively, have a wet layer of fabric between your skin and the ice pack.
When icing, remember the CBAN formula – Cold/Burn/Ache/Numb. At first it will feel cold, then it will burn, then it will ache, and then it will be numb. Your mission is to endure the first three steps and make it to Numb. Then, you can remove the ice pack. Or you can just set a timer for 20 minutes.


Icing Your Upper IT Band
Place the ice pack on the upper part of the IT band, near the hip. This area is usually tender if inflammation is present.
Icing Your Middle IT Band
Move the ice pack to the middle of the thigh. Ensure it covers the entire middle area of the outer thigh.
Icing Your Lower IT Band
Position the ice pack on the outer side of the knee, where the IT band attaches to the tibia.
Duration of Icing
Ice for 15-20 minutes: Apply the ice pack for 15-20 minutes. If the ice is in contact with your skin, then do not exceed 20 minutes to avoid skin damage.
Frequency: Repeat this process every 2-3 hours during the initial 48-72 hours following the onset of symptoms. Continue even longer if you are still experiencing acute pain. If not, you can scale back the frequency.
Position of Your Body During Icing
Comfortable Position: Sit or lie down in a comfortable position while icing. Try to elevate the affected leg to help reduce swelling.
How to Gradually Return to Cycling as You Recover from Iliotibial Band Syndrome
Get Your Bike Fit and Saddle Fit Right
If you suspect a badly fitted bike was the root of your problems, be certain to fix this before hopping on the saddle! Check out our post on how to get your saddle height, setback and tilt dialed in correctly.
Related Post: How to Find the Right Height and Setback for Your Bike Saddle
Related Post: How to Come Back from a Cycling Injury
Start Slowly
Begin with short, low-intensity rides on flat terrain. Limit your first few rides to 10-15 minutes and gradually increase the duration by 5-10 minutes each session.

 Begin with short, low-intensity rides on flat terrain. Think “seaside” rather than “French Alps”
Cadence and Gear Selection
Maintain a higher cadence (spinning the pedals faster) in a lower gear to reduce stress on the knees.
Listen to Your Body
Pay attention to any pain or discomfort. If symptoms return, reduce your activity level and return to stretching and strengthening exercises.
Bottom Line on Iliotibial Band Syndrome (ITBS) in Cyclists
The best way to avoid ITBS is not to do anything downright stupid. (As I always said to my kids, learn from my words, not my actions.) If you are in training for a cycling event, increase the intensity slowly and carefully. Also incorporating the stretches and exercises in this post, especially if you are doing a lot of cycling. This way, you can effectively manage and prevent ITBS, allowing you to maintain your active lifestyle without pain. Please enjoy it. I remember how much fun it used to be, before ITBS confined me to my chair!
Sources Consulted for this Post
Fairclough, J., Hayashi, K., Toumi, H., Lyons, K., Bydder, G., Phillips, N., & Best, T. M. (2007). Is iliotibial band syndrome really a friction syndrome? Journal of Science and Medicine in Sport, 10(2), 74-76.
Fredericson, M., & Wolf, C. (2005). Iliotibial band syndrome in runners: innovations in treatment. Sports Medicine, 35(5), 451-459.
Harvard Health Publishing. https://www.health.harvard.edu
Khaund, R., & Flynn, S. H. (2005). Iliotibial band syndrome: a common source of knee pain. American Family Physician, 71(8), 1545-1550.
Mayo Clinic. https://www.mayoclinic.org
Michael, J. P., & Westrick, R. B. (2012). Iliotibial band syndrome. Current Sports Medicine Reports, 11(4), 230-234.
WebMD. https://www.webmd.com
Related Medical Posts for Cyclists
Related Post: Exercise Doesn’t Help with Fat Loss – A Myth that Needs to be Busted?
Related Post: How to Come Back from a Cycling Injury
Related Post: Four Steps to Prevent and Recover from Cyclist’s Knee (Patellar Tendinitis)
Related Post: How to Modify Your Bike to Cycle with Thumb Arthritis (CMC Arthritis) or De Quervain’s Tenosynovitis
Related Post: Can Cycling Cause Penis Numbness, Erectile Dysfunction, and Prostate Cancer?
Related Post: 3 Easy Tips for Preventing Plantar Fasciitis – and 5 Simple Exercises to Cure It
Related Post: Piriformis Syndrome in Cyclists – How to Prevent and Cure It
Related Post: Returning to Cycling and Swimming after Severe Piriformis Syndrome: A Step-by-Step Plan
Related Post: A Step-by-step Guide to Returning to Cycling After Severe Piriformis Syndrome
Related Post: Exercises and Stretches for Piriformis Syndrome in Cyclists
Related Post: How to Cure Cycling Knee Pain with a Miraculous, Cheap Cure
Related Post: 5 Doctor’s Tips to Start Cycling Again after Knee Replacement Surgery
Related Post: Science Shows that Exercise is a Miracle Cure and Protects You from Diseases
Related Post: 7 Ways to Prevent Cycling Knee Pain

Leave a Reply