
This post explains how to find the right height, setback and tilt for your bike saddle. If your saddle is poorly fitted, you could end up with a wide range of pain and and injuries. A well-fitted, comfortable bike saddle will enable you to enjoy cycling, while a poorly fitted saddle could cause you to give up cycling in painful despair.
Related Post: 9 of the Best Road Bike Saddles
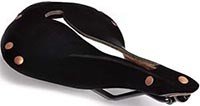
Components of a Bike Saddle: Shell, Cover, Rails, and Suspension
Saddles have a number of components, including the shell, cover, rails, and suspension. The saddle shell creates the shape. It is usually made of aluminum; however, shells can also be made from carbon fiber, plastic, nylon, or even leather.
The cover goes on top of the shell. Covers are the padding on the saddle and can be made of foam, gel, fabric, artificial leather, real leather, or a type of vinyl. The rails of the saddle are the two bars which connect the saddle to the seat post. They may be made of steel, titanium, aluminum, or carbon fiber. Lastly, the suspension of a saddle may have springs to absorb the vibrations from the road.
 |  |  |  |  |
| Usually about $170 - Please Click Here to See the Best Price on Amazon right now | Usually less than $140 - Please Click Here to See the Best Price on Amazon right now | Best Price on Amazon right now: | Best Price on Amazon right now: | Usually about $100 - Please Click Here to See the Best Price on Amazon right now |
 |  |  |  | |
| Usually about $190 - Please Click Here to See the Best Price on Amazon right now | Best Price on Amazon right now: | Best Price on Amazon right now: | Best Price on Amazon right now: | |
Most Important Saddle Adjustment: Saddle Height
The key adjustments to your saddle are its height, its fore/aft position, and its tilt. We are starting with the most important, the saddle height.
How to Measure your Bike Saddle Height
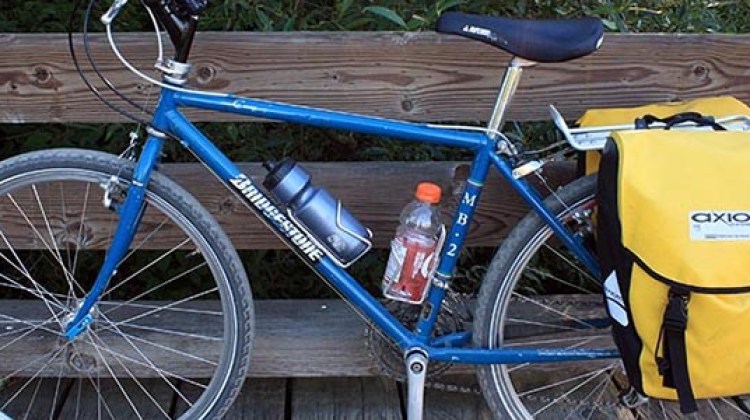
The standard way to measure bike saddle height is to measure from the middle of your bottom bracket (the round thing that your pedals attach to) to the middle point of the top of your saddle. Take that measurement now, and then compare it to what your bike saddle height should be, based on the next section of this post.

 Measure from the middle of your bottom bracket to the middle point of the top of your saddle to get the current height of your saddle
How to Figure Out What Your Saddle Height Should Be
There are three main options for determining your optimal bike saddle height. They are the heel-to-pedal method; the Inseam formula method (aka the Lemond method); and knee angle method. They are all quite simple and easy to do.
However, they are all starting points. Once you have determined your basic saddle height with one of these, you may still need to fine tune it by a few mm up or down to get it completely comfortable. Your own body’s biomechanics and your own cycling style can make a difference. For example, I have found that the height I prefer is usually about 1 cm higher than what the heel-to-pedal method predicts.
Method 1: Heel-to-Pedal Method (Basic)
For this method, it is best to have a bike trainer to stand your bike up. You could also ask a friend to hold it up. The last alternative is to hold your bike up against a wall, but this is really quite tricky to do. It is hard to focus on your knees and hips while you are trying not to fall over.
- Sit on the saddle with your heels on the pedals.
- Pedal backward until one leg is fully extended at the bottom of the stroke. Make sure your heel is able to reach the pedal.
- Your knee should be completely straight.
- If your knee is bent, the saddle is too low.
- Start cycling and see how it feels. If your hips rock, the saddle is too high.

 The heel-to-pedal method is the most basic way to check your saddle height
Method 2: Inseam × 0.883 Formula (More Precise)
This method is also known as the Lemond system, named after US professional cyclist Greg LeMond, who developed the formula.

 Stand barefoot against a wall, place a book between your legs (like a saddle), and measure from the floor to the top of the book
- Measure your inseam: Stand barefoot against a wall, place a book between your legs (positioned like a saddle), and measure from the floor to the top of the book.
- Multiply your inseam length by 0.883 to get the saddle height. For example, if your inseam is 70 cm, then you multiply this by 0.883, and your saddle height should be 618 mm (61.8 cm). This example is a fairly short woman, so don’t panic if your measurements are much longer.
Method 3: Knee Angle Method (Most Accurate) Using a Goniometer and an Assistant
For this method, you will need a goniometer (see further below). Also, it is best to have an assistant to measure your knee angle bend, and a bike trainer to hold up your bike while you sit on it.
- First, ask your assistant to watch you cycling. They should assess whether you cycle with your heel up or down. There are wide individual differences in this.
- Next, sit on the bike on a trainer, with one pedal at the lowest position (the 6 o’clock position).
- Place your feet on the pedals, and make sure that the foot on the lowest position is angled the same as when you ride. For example, if you usually cycle with your toe down and your heel up, position your foot on the pedal to match this.
- Then, ask your assistant to use the goniometer to measure your knee angle when the pedal is at the lowest position (the 6 o’clock position).
- Line the goniometer up with your femur at the top (pointing to the hip), and your shin bone at the bottom, pointing to your ankle bone.
- The ideal knee bend should be 25–35 degrees when the foot is in pedaling position.
- For most people, 30 degrees is the sweet spot.
- Usually, 1 mm is equivalent to 1 degree. So if your knee is bent 5 degrees too much, then try raising your saddle by 5 mm, to aim to reduce the bend by 5 degrees.
- You can buy a goniometer from Amazon for around $6.00. You could buy a specialized bike fit goniometer, but those are more expensive. A regular cheap goniometer will work just fine.


How to Adjust a Bike Saddle to Get the Height Right
To get your bike saddle height right, you will need to adjust your seat post. The seat post is the long stem that connects your saddle and the triangular frame of your bicycle. It can be made longer or shorter by releasing the seat clamp and then sliding the seat post up or down.


Some seat clamps can be tightened or loosened with an Allen key (also called a hex key). Others have a quick release lever. This is a quick and easy adjustment to make.
 |  |
 |  |
 | |
Horizontal Position of Bike Saddle – the Saddle Setback (also called Fore/Aft)
The horizontal position of your saddle can also be adjusted. This position is called the saddle setback, and is also known as the fore/aft position. As its name suggests, it has to do with how far forward or backwards your saddle is, on the horizontal plane. Saddle setback is measured from a vertical line through the bottom bracket to the nose of your saddle. It determines how far forward or backward you sit in relation to the pedals.
How to Adjust Your Saddle Setback
You usually just have to loosen off the nuts that hold the saddle on the rails. Then, you can choose to slide your saddle forwards towards the handlebars, or backwards towards the rear wheel. This adjustment will help you to optimize your reach to the handlebars. It will also help you optimize your position relative to your pedals. You do not want to be too far ahead of them, as this can cause knee pain and injury.
Bear in mind that this is a dynamic adjustment. As you move the saddle forward or backwards, the height of the saddle will be effected, so you might have to re-adjust the height of the saddle again.
Why Saddle Setback Matters for Comfort and Injury Prevention
Your saddle setback determines how your body weight is distributed on the bike and how your muscles engage while pedaling.
- Too far forward: Places excessive stress on the knees, especially the patellar tendon, leading to pain in the front of the knee (patellar tendinitis). It can also force too much weight onto your hands and wrists, causing numbness or discomfort in the shoulders and neck.
- Too far back: Overloads the hamstrings and glutes, which can lead to lower back strain, hip discomfort, and inefficient pedaling.
An incorrect setback doesn’t just make your rides uncomfortable — it can lead to chronic injuries that sideline you from cycling altogether.
How to Find What Your Current Saddle Setback is
- Find the bottom bracket (BB) – This is where the cranks (pedals) attach.
- Measure a straight horizontal line from the BB to the nose of the saddle.
- Use a laser level or a straightedge ruler to ensure accuracy.
- This measurement is your saddle setback.
Go ahead and measure your current saddle setback. Then see how well it correlates with the guidance below, and adjust as necessary.
General Guidelines for Saddle Setback
- Road cyclists: 4–8 cm setback (varies by flexibility and riding style)
- Triathletes/TT riders: 0–4 cm (forward position for aero efficiency)
- Mountain bikers: Highly variable, but often similar to road setups
How to Find Your Ideal Saddle Setback
1. Start with a Baseline Check (Knee Over Pedal Spindle – KOPS Method)
A common starting point for setback adjustment is the KOPS method:
- Sit on your bike in a normal riding position.
- Rotate the pedals until your forward foot is at the 3 o’clock position.
- Drop a plumb line (string with a weight) from the bony part of your kneecap (tibial tuberosity).
- Ideally, the line should pass through the center of the pedal spindle (the central axis of the pedal).
This is only a guideline—body proportions vary, so further fine-tuning is often necessary.
2. Listen to Your Body: Signs of Incorrect Setback
Your body will tell you if your saddle setback is off. Pay attention to these common warning signs:
If Your Saddle is Too Far Forward:
- Knee pain (especially at the front of the knee) due to excessive strain on the patellar tendon.
- Hand, wrist, or shoulder pain from too much weight on the handlebars.
- Tight quads and overworked thigh muscles, leading to faster fatigue.
If Your Saddle is Too Far Back:
- Lower back pain due to excessive stretching and improper spinal alignment.
- Hamstring and glute strain, leading to soreness and potential injury.
- Hips rocking in the saddle, causing discomfort and reducing pedaling efficiency.
3. The Fore-Aft Balance Test: A Simple Comfort Check
To fine-tune your setback, try this test:
- Ride in a neutral position with your hands on the hoods and core engaged.
- Lift your hands slightly off the handlebars.
- If you fall forward, your saddle is likely too far forward.
- If you fall backward, your saddle is too far back.
- If you can hover comfortably without shifting, your position is likely correct.
4. Small Adjustments for Big Gains in Comfort
- Adjust in small increments (2-3mm at a time).
- After changing setback, check your saddle height—it may need slight modification.
- Consider your riding style:
- Endurance riders often prefer a neutral or slightly rearward position for comfort.
- Racers may opt for a slightly forward position for aggressive pedaling.
5. Fine-Tuning for Comfort and Performance
Once you’ve measured your setback, test your setback position by riding for at least 15-20 minutes. Pay attention to:
Knee comfort – No pain in the front or back of the knee.
Weight distribution – No excessive pressure on hands or arms.
Pedaling efficiency – Smooth power transfer without rocking hips.
Making Small Adjustments
- If you feel quad fatigue or knee pain, try moving the saddle back slightly.
- If you feel hamstring tightness or lower back discomfort, try moving the saddle forward a few millimeters.
- Adjust in small increments (2-3mm at a time) and test ride again before making further changes.
 |  | | | |
Achieving Optimal Handlebar Reach
Ideally, after adjusting your saddle setback, you should be able to reach your handlebar grips comfortably, without any straining, as this may cause back pain.
Note that if you cannot achieve optimal reach by adjusting the saddle (as this adjustment typically can only make a couple of inches difference), the best solution is to fit a different stem on your handlebars. This can bring the grips substantially closer. You can order a stem online and fit it yourself. This is a very easy home adjustment.


Tilt of Bike Saddle
This is the third aspect of your bike saddle fit that needs to be fine tuned. Usually, your bike saddle should be parallel to the ground. If it is tilted upwards towards the front, it may cause groin discomfort. On the other hand, if you find you are not comfortable, try angling it downwards in front just a tiny bit at a time, about 1 degree. This helps some people to experience less saddle soreness.
Bottom Line
The single most important thing in a bike fit is to make sure that your saddle fits perfectly. We hope that this post will help you to get yours just right.
Related Post: How Women Cyclists Can Prevent Saddle Soreness and Associated Issues
| |
|---|


Related Post: Can Cycling Cause Penis Numbness, Erectile Dysfunction, and Prostate Cancer?
Other Related Posts that Could be Helpful for You
Related Post: Piriformis Syndrome in Cyclists – How to Prevent and Cure It
Related Post: Exercises and Stretches for Piriformis Syndrome in Cyclists
Related Post: Top 10 Tips to Avoid a Sore Butt from Cycling
Related Post: Our Miraculous, Cheap Cure for Cycling Knee Pain
Related Post: 7 Ways to Prevent Cycling Knee Pain
Related Post: The 10 Best Stretches for Cyclists
Related Post: How to Prevent Plantar Fasciitis – PLUS our Easy Cure
Related Post: 9 of the Best Road Bike Saddles
Related Post: Zacro Gel Seat Cover – a Budget Solution for Saddle Discomfort
Check Out Our Most Popular Posts! | ||
| ||
Did you enjoy this post or find it helpful? If so, please support our blog! We write this blog because we love cycling. But we also need to earn a living, so we would appreciate it very much if you click through to one of our reputable affiliates for your online shopping. We are proudly affiliated with Amazon, which sells pretty much everything, and has outstanding shipping and return policies. When you buy from our affiliates we make a small commission, and this is the only way we earn any income. Plus, it costs you nothing at all - a real win/win situation! We here at Average Joe Cyclist do not receive any information AT ALL about who you are, where you live, or what your dog's name is. Buying through our Amazon links is simply an anonymous way to thank us for our efforts, like tossing a few coins in a tip jar. Except that it is Amazon who tosses the coins, not you! | ||
")


")
")


")
")
")

")


")
")


")


Daniel Rosen says
thanks for the review. interesting article