
This post offers five tips that will help to make indoor cycling more comfortable for you, reducing your chance of injury. Indoor cycling has exploded in popularity, with more riders turning to smart trainers and stationary setups to maintain their fitness year-round. And apps like Zwift and Rouvy make it fun as well. But while training indoors has its benefits—like convenience, safety, and controlled conditions—it also comes with unique challenges that can impact your comfort, performance, and even long-term health. Personally, I have spent hundreds of dollars on physiotherapy for injuries stemming from badly fitted indoor bikes. Let’s make sure that doesn’t happen to you!
I found some of these tips in Bike Fit: Optimize Your Bike Position for High Performance and Injury Avoidance, by Phil Burt. Burt is a renowned bike fit expert, and he explains the key adjustments cyclists need to make for a more efficient and pain-free cycling experience.


Related Post: How to Come Back from a Cycling Injury
Tip 1. Manage Heat and Sweat Effectively
One of the biggest differences between outdoor and indoor cycling is airflow. When you’re riding outside, the natural breeze helps regulate body temperature. Indoors, however, heat builds up quickly, leading to excessive sweating and potential dehydration. When I started Zwifting in 2023, I was amazed at how much more I sweated indoor than outdoor. For many indoor cyclists the situation is so extreme that they end up corroding their bikes with sweat.
Solution:
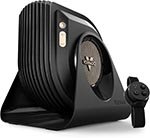
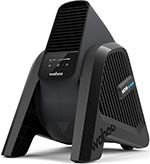
- Set up one or (preferably) more fans to improve airflow. A high-powered floor fan positioned at the front and another angled from the side can help keep your body temperature in check. Zwift sells dedicated fans, which are not cheap ($300!). Wahoo also offers a dedicated fan, the Wahoo KICKR Headwind. You can link it to your heart-rate monitor and your speed sensor, and set it to increase the wind when your heart rate or your speed rise. However, it is expensive (also around $300). Alternatively, you can find a much cheaper but still powerful fan online.
- Some of these fans come with remote controls. Personally, I have a no-name fan plugged into a Smart plug. That way, I can start off with the fan off, and then ask Alexa to turn it on once I start to sweat.
- Train in a well-ventilated area, preferably near an open window or with air conditioning.
- Stay on top of hydration—indoor cycling causes more sweat loss than outdoor riding. Definitely consider adding electrolytes to your water bottle for longer sessions.
 |  |
 |  |
 |  |
 |  |
2. Adjust Your Bike Fit for Indoor Riding
Even if your outdoor bike fits you perfectly, the static nature of indoor riding can create new discomforts. Since you’re not shifting in and out of the saddle as much, and the bike is not moving, pressure points become more pronounced. Also the pressure is more consistent and sustained, as there are no opportunities to just coast down a hill. Plus, almost all the effort is coming from your lower body. When you’re outdoors and very active in your saddle and on the cranks, a significant amount of power comes from your upper body and core.

 The static nature of indoor riding can create new discomforts
What to tweak:
- Slightly raise your handlebars to reduce strain on your shoulders and wrists, especially if you’re spending long hours on the trainer. This will also open up your hips for greater power transfer, and open up your lungs for more efficient breathing.
- Adjust your saddle height and fore-aft position if you’re experiencing excessive saddle pressure or numbness. You might find you need your saddle to be lower than what you are used to outside.
- Also try standing up every 5 to 10 minutes. Consider setting a timer to remind yourself. This can go a long way towards reducing the pressure on your body.
- Experiment with small changes—very tiny adjustments can make a very big difference.
Related Post: How to Find the Right Height and Setback for Your Bike Saddle
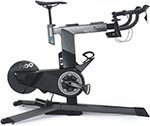
3. Use the Right Equipment
Indoor cycling places unique demands on your bike and body. To enhance your experience and prevent unnecessary wear and tear, consider investing in the right gear.
Gear to consider:
- A sweat guard or towel over your handlebars and top tube to protect your bike or trainer from corrosion. And of course, to wipe yourself down as well.
- Decent cycling shorts in good condition. Don’t use your old ones just because you’re inside! You actually need more protection indoors than outdoors, because of the rigidity of the bike. Bib shorts with padding are absolutely ideal, as they will stay in place and protect you.
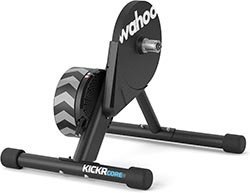
- A rocker plate, such as the highly rated KOM Rocker Plate. These are moving platforms for your trainer that will enable it to move more in response to your efforts, which can considerably reduce the pressure on your body. The KOM Rocker Plate is lower priced than most, and it works with Wahoo Kickr Core Trainers, TacX Neo 2T, Saris, and other trainers too.


- A dedicated smart trainer. If you can possibly afford it, smart trainers are the way to go. They make the ride much more realistic by matching the terrain on your app, and they enable you to use ERG mode for some serious training. Spending some money on a dedicated trainer is an excellent investment that will help you to train without injury. I have just ordered a Zwift Ride, which offers the ability to easily fine-tune your bike fit for yourself and for different people in the family. The frame without trainer is around $800, which includes the controllers on the handlebars. I think that is a pretty good deal. I hope that having a better fit will prevent further injuries. If you have even more money to spend, you could consider a Wahoo Kickr Bike. Or, for around $500, you can mount your bike on the very highly rated Wahoo KICKR Trainer.
4. Keep Your Mind Engaged
Let’s face it—staring at a wall while pedaling can get boring fast. Unlike outdoor riding, where scenery and terrain changes – and even just dodging cars – keep things interesting, indoor cycling can feel monotonous if you don’t mix things up.
Ways to stay motivated:
- Use training apps like Zwift, Rouvy, TrainerRoad, or Wahoo SYSTM to make your sessions interactive. I use Zwift with Apple TV on a big screen TV, which makes the experience immersive and downright fun. I remember how boring indoor training was when I was a teenager, but now I am addicted to it. And when I get tired of fun ways to train in Zwift, Rouvy offers an awesome change with its realistic feel, based on real-world video footage of famous cycling routes.

 I use Zwift with Apple TV on a big screen TV, which makes the experience immersive and downright fun
- Structure your workouts with interval training to stay engaged and build fitness efficiently. Apps like Zwift and TrainerRoad offer training workouts and programs that you can follow. And Zwift and TrainerRoad just became compatible with each other, making training sessions potentially more productive and more fun. These kind of structured workouts are my personal favorite, because I don’t have to spend hours planning my training sessions. I just choose a training plan and follow it for a few months, and then choose a different one.
- Set clear goals, whether it’s completing a certain mileage, maintaining power output, or preparing for an event. In my experience, writing those goals down is very helpful. Also, as your write them down, make sure they are SMART goals: Specific, Measurable, Achievable, Relevant, and Time-bound.
Tip 5: Save the Indoor Rides for Shorter, More Intensive Workouts
No matter how well you set up your pain cave, and no matter how much great equipment you invest in, indoor bike rides are harder on your body than outdoor bike rides.
Solution:
It is a good idea to do your long, endurance bike rides outdoors, and do your shorter, more intensive workouts indoors. This will just reduce the amount of time you spend on a relatively rigid bike.
Of course, this is not an option for many people. For example, you may be cycling indoors because of intense weather conditions in summer or winter. However, if it is an option for you, it is well worth considering. This summer, I am planning to do my intensive workouts on Zwift, and my endurance training in the pool. And I will be doing indoor strength training and yoga. I find that a yoga session directly after a bike training session is an excellent way to stretch out and make injury less likely.

 We like to do some yoga to stretch our bodies and avoid injuries
In this way, I hope to avoid injury to my body. Cross-training has multiple benefits apart from just reducing the risk of injuries, such as balancing your muscle development.
Related Post: Exercises and Stretches for Piriformis Syndrome in Cyclists
Bottom Line
Indoor cycling is an incredible tool for building fitness, but small tweaks in your setup can make a big difference in comfort and performance. By optimizing airflow, adjusting your bike fit, using the right gear, keeping your mind engaged, and diversifying your training, you’ll not only improve your indoor riding experience but also reduce the risk of injuries.
Have you made any adjustments to your bike fit for indoor riding? Share your tips in the comments!
| |
| |
| |
| |
 | |  |

Leave a Reply